Category Archives: Uncategorized

Introduction to ODL

Tutorial No.1

Introduction  to  Opendaylight

               Before getting started with Opendaylight, let me clear one thing that SDn is not only OpenFlow. It is only single standardized protocol by Open Networking Foundation between ofswitch and ofcontroller for SDN. ONF defines SDN as separation of control and data plane which is nothing but how we get SDN is. But if we know what we are getting in                        SDN we can choose our own path to get SDN.
Now the thing is what SDN gives us is programmability, openness, orchestration, Dynamic Servicing, Simplicity & agility, automation, virtualization of network etc. If this is what SDN is, then I have my own way to get it, said industries.
Opendaylight is an open source software project under the Linux Foundation with goal of furthering adoption and innovation of Software Defined Networking through the creation of common industry supported platform. ODL aims to accelerate adoption of Software Defined Networking (SDN) & Network Function Virtualization (NFV).It is officially started on 8th April 2013 and is based on Eclipse Public License v1.0 [EPL].

helium

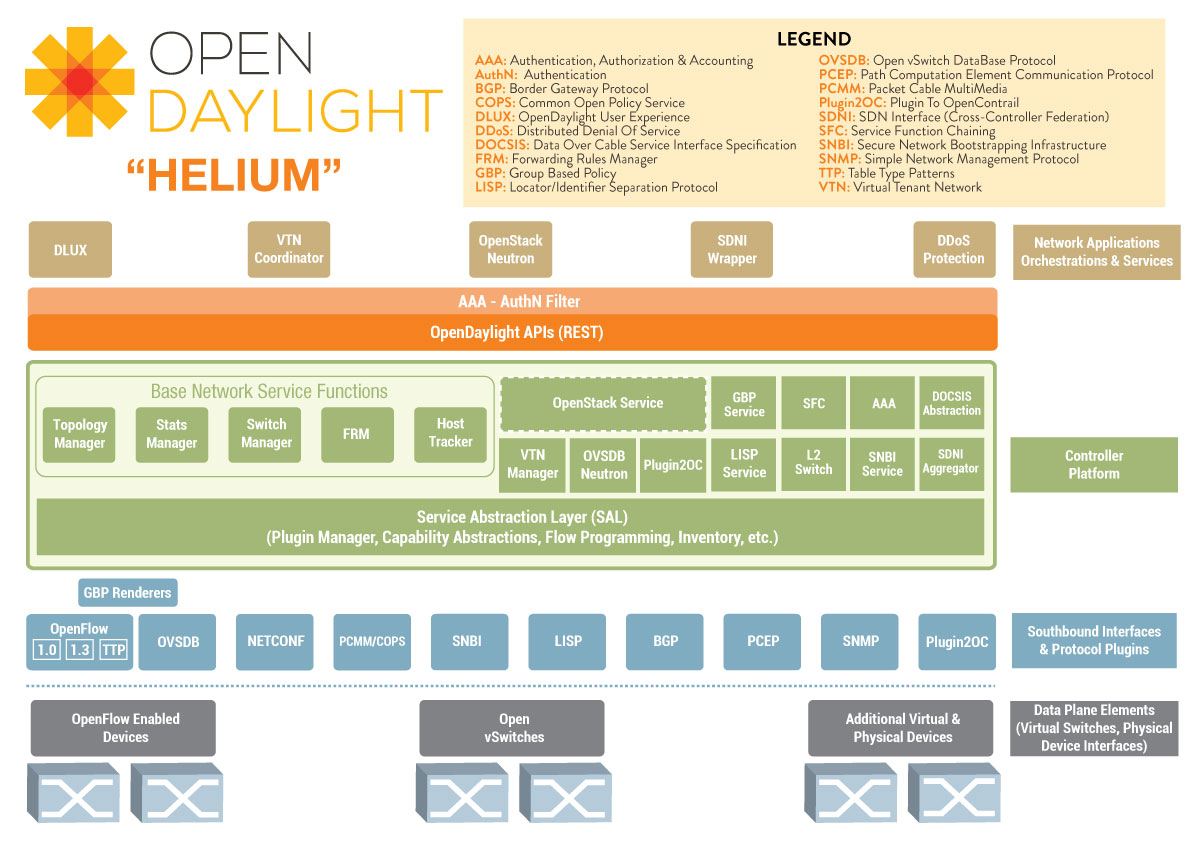
               Opendaylight has main three components viz. Network Application & orchestration [management plane], controller platform [control plane], physical-virtual devices [Forwarding plane]. Let’s us try to understand ODL architecture basics. The infrastructure plane may consist physical devices like OpenFlow switches, or virtual devices like openvSwitches. In the management plane there may be GUI/CLI or any cloud mgmt. application like Openstack etc.  build on RESTful / JAVA API and OSGI framework. South bound interfaces includes OpenFlow or other protocols like PCE, XMPP, BGP, SMTP, NETCONF etc. This is what the beauty of Opendaylight controller that supports multi-protocols. And these southbound plugins talks to controller platform & network elements via Service Abstrac tion Layer(SAL). And northbound plugins to expose interfaces to those writing applications to the controller. Also pugins for inter controller connection.
Job of SAL is to create a layer against which the application can be developed without assuming the underlying SDN enabling protocol it’s talking about.

POX basics – handling network events

Any topology will work for this, although the bigger it is the harder but more interesting.

https://gist.github.com/JamesWKerr/e8fad674b4593f2db8e3

This topology is used in Data Centres: the top four gateways to the internet would lead to  the root node, with the leaves(bottom nodes) being the hosts.

It looks something along these lines…

network-topology

To begin, open a text editor of your choice (sublime3, notepad++,vim, nano etc)

and save the file as a .py, to enable syntax highlighting.  I called mine rather unimaginitively EventViewer.py. Save this to the directory ext. This is where all your modules go.

D


I run mininet natively on linux, recommended for scalability and ease of use if you can, so my command is pox naturally, then the combination of my python module and the l2.learning. As before in simulation, use openvswitch and a remote controller. You can use my topos, or keep things simple as before. The ampersand at the end daemonises pox so you regain control of your terminal.

/home/james/pox/pox.py EventViewer.py l2_learning log –no-default –FatTree.py

 –controller=remote -switch ovsk –topo=mytopo–mac &

POX GUI


Note : To use this front-end you need to run pox on your local machine,not in a virtual mininet environment

*Requires python to be installed

1.Clone pox from github using –

git clone https://github.com/noxrepo/pox

Else point your browser here & download the zip file

2.Clone poxgui using

git clone https://github.com/abh15/pox-gui-frontend

Else point your browser here  & download the zip file

3.Install mono

-For Windows

Execute poxgui.exe

-For Mac

Download & install latest Mac OS X mono package from here                                                                From terminal cd into the directory where poxgui.exe is located and execute ‘mono poxgui.exe’

-For Linux

Download mono for your distribution from here                                                                             (Ubuntu users can download using ‘sudo apt-get install mono-complete’).                                     From terminal cd into the directory where poxgui.exe is located and execute ‘mono poxgui.exe’


4.

-Give the path to folder containing pox.py

-Select the appropriate log level & run the required script.

-DO NOT run another script without terminating the current script.

-If you get ‘error 48 while binding socket: Address already in use’ force stop python process from task manager or restart the computer


gui

Introduction to SDN

Software-defined networkingis a new approach to networking that brings programmability to network devices which is hitherto unseen in this field. It also enables centralized managing of network devices. It enables programming devices in plethora of languages like Java,Python,Ruby,C,C++.It also promotes open software in networking devices rather than closed source systems which exist today.

Current network scenario is marred by many problems like complexity which is caused by plethora of protocols developed by organisations which are static in nature in contrast to dynamic nature of traffic. Current networks cannot be managed through centralised systems.They are unscalable in nature which make them unsuitable to ever increasing requirements of networks. Also today’s networking industry is a oligarchy consisting of few companies.

We need a new network architecture due to various reasons like constantly changing traffic patterns. IT industry’s rapid embracement of cloud services has created security & complexity problems which need to be addressed. Handling today’s big data means exponential increase in required bandwidth which is hard to satiate. All this problems can be answered using software defined networking (SDN).

SDN is characterised centralised control of multi vendor devices. All SDN enabled network devices can be controlled by a centralised system irrespective of the vendor. OpenFlow-based SDN offers a flexible network automation and management framework, which makes it possible to develop tools that automate many management tasks that are done manually today. OpenFlow‘s flow-based controlmodel allows IT to apply policies at a very granular level, including the session, user, device, and application levels. Main feature of SDN is that it brings awesomeness of open source to networking & thus automatically bringing down the cost of networking devices.

arch

Custom scripts on Controller

Tutorial No.7

Custom scripts on Controller

                      For same tutorial in simulation we have used Virtual Network Descriptor to create topology and controller scripts. If you are new to python coding you can use same controller script directly on our real OFCTL. Refer to Tutorial no.11 in simulation for generating custom scripts.Download the controller script. Put the resultant script in either ext or forwarding directory. Here we’ve used forwarding directory.

 1) Save custom script

custom1

2) Run the script. Here you can see our custom or static flows are installed.

custom

Flow installation with DPCTL

Tutorial No.6

Flow installation with DPCTL

                     DataPathController (DPCTL) is command line tool which sends OpenFlow messages to switch. Using this tool we get switch port and flow statistic also flow entries. We can also add flow rules in OpenFlowswitch using DPCTL. It’s very great tool to communicate switch directly without OpenFlowController.

In this tutorial, we use DPCTL to get flow status from switch and also we will learn how to add flow rule in switch using DPCTL.

1)To see installed flows

dpctl dump-flows tcp:127.0.0.1:6633

         Here we have added flow as we added in simulation tutorial. Also you can verify installed flows using above command.

dpctl add-flow tcp:127.0.0.1:6633 in_port=1 actions:output=2        

dpctl add-flow tcp:127.0.0.1:6633 in_port=2 actions:output=1

dpctl

You can verify results using ping utility.

Simulation scripts on real OFCTL

Tutorial no 4

                   Here we will run scripts that we have ran during simulation session. There will not be any big difference. Remember each  time you have to start openflow so I will avoide this step and show you how to handle with controller. Let’s start with some default scripts.

1) Hub.py

Start openflow

Start controller

python pox.py log.level – -DEBUG forwarding.hub openflow.keepalive

hub

Verify result with ping and tcpdump utility. Also hubifying on controller.

2) L2_learning.py

Start openflow

Start controller

python pox.py log.level – -DEBUG forwarding.l2_learning openflow.keepalive

l2_learning

Verify result with ping and tcpdump utility. Also MAC learning on controller,

3) L3_learning.py

Start openflow

Start controller

python pox.py log.level – -DEBUG forwarding.l3_learning fakeways=192.168.10.1,192.168.50.1 openflow.keepalive

l3_learning

Assign IP from different network(I have used from 192.168.10.0 & 192.168.50.0) to hosts and give fake gateways since openflow doesn’t care about gateways its juast to keep hosts happy. Verify result with ping and tcpdump utility. Also observe ARPing on controller.

4) L2_firewall.py

Firewall script available here download and save it. I have saved in pox>pox>forwarding folder. Edit MAC of hosts as needed. It forward packets listed in script and drops others.

Start openflow

Start controller

python pox.py log.level – -DEBUG forwarding.l2_learning openflow.keepalive

l2_firewall

MAC address 00:26:82:cd:dd:d5 is listed in script hence packets related to it are forwarded else dropped.

5) Port_blocker.py

Download script from here save in pox>pox>ext folder. I have saved with name blocker.py, Also you have to pass port number parameter. I have given port number 8080.

Start openflow

Start controller

python pox.py log.level – -DEBUG forwarding.l2_learning blocker –ports=8080

port_blocker

Verify result by requesting 8080 or HTTP service from host. You can see 8080 packets are get blocked.

6) dhcpd.py

Start openflow

Start controller

python pox.py log.level – -DEBUG proto.dhcpd –-network=10.1.1.0/24 –-ip=10.1.1.1 -–first10 –-last=None –-router=None –-dns=4.2.2.1 openflow.keepalive

dhcp

You can see two IP addresses from given IP network are leased.

Interfacing control & data plane

Tutorial no 4

Interfacing control and data plane

                                In the last two tutorials we installed our python based SDN controller POX, on Raspberry Pi and flashed TPlink 841N v9.0 with OpenWRT image (OpenWRT with OpenFlow 1.0). Also we have configured network and OpenFlow files from our OFSwitch (OpenFlow enabled Switch i.e. TPlink 841 router with newly flashed image here). Now it’s time to interface both control (Raspberry Pi) and Data plane (OFSwitch=router).

1) Connect Ethernet cable between WAN port() of router (OFSwitch) and RJ45 port of Raspberry PI (OFCTL-OpenFlow Controller). Power up router and Raspberry PI. Set up will look like this.()

IMG_20150124_105929425

Note: If you need to set Raspberry pi IP address. Refer this

2) ssh into control and data plane. (Use IP as you set)

root@192.168.0.1                      # ssh to data plane i.e. Router

root@192.168.0.2                      # ssh to controller i.e. Raspberry pi

Now start openflow on Router (192.168.0.1 in my case)

/etc/init.d/openflow start

Simultaneously boot POX on raspberry pi

python pox.py openflow.keepalive

testconn_ctrl

testconn_data

Note:If connection fails, try connecting pi to LAN port no.1 or no.4 of router.